How Professionals Avoid Wallpaper Bubbles
April 18, 2025 – House of Londinium
We love how wallpaper can transform a space with style and character but nothing spoils that fresh look faster than unsightly bubbles. Those pesky air pockets not only ruin the appearance but they also disrupt the overall finish. That's why you need to tackle them quickly to preserve our décor.
We'll explore what causes wallpaper bubbles how to fix them and tips to keep everything in place for the long haul. By understanding common mistakes and using a few clever tricks we can protect our investment and keep rooms looking flawless.
What are Wallpaper Bubbles?
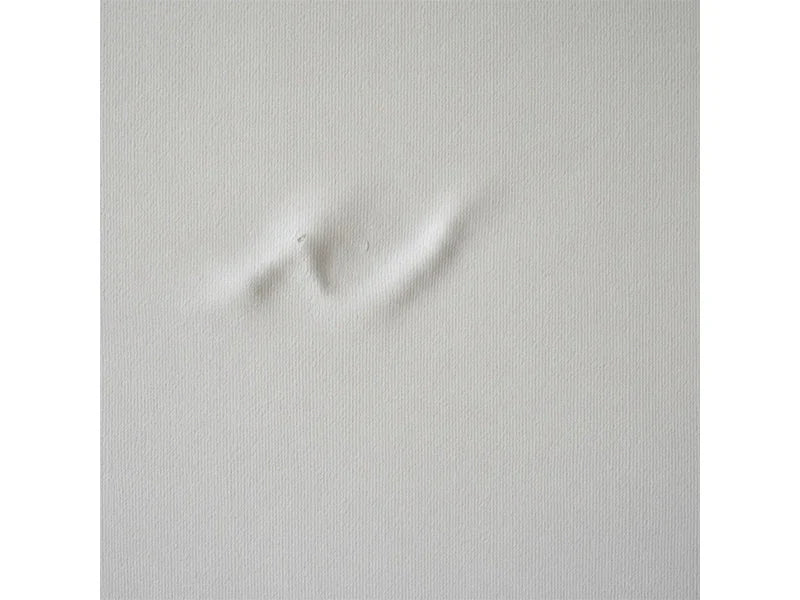
Wallpaper bubbles undermine décor by creating uneven spots that disrupt the smooth finish. We observe them if adhesives weaken or if moisture seeps behind the surface. They're commonly found in both fresh and older wallpaper installations, especially if walls aren't fully prepared or if temperature shifts affect the adhesive. We examine the substrate for dust or leftover paint if lumps persist. Proper wall treatment prevents repeated air pockets.
|
Common Causes |
Approximate Frequency |
|---|---|
|
Moisture infiltration |
40% |
|
Loosened adhesives |
30% |
|
Substrate irregularities |
20% |
|
Temperature shifts |
10% |
Common Causes of Wallpaper Bubbles
Wallpaper bubbles often arise from multiple elements. We address two primary triggers that challenge wall integrity.
|
Cause |
Approximate Frequency |
|---|---|
|
Moisture Issues |
40% |
|
Poor Preparation |
25% |
Moisture Issues
Damp or moisture buildup behind wallpaper generates pockets. We record around 40% incidence stemming from leaking pipes or humid conditions. This dampness undermines adhesion.
Poor Preparation
Poorly prepared surfaces create uneven adherence. We estimate about 25% of all reported bubbles occur when old paste or loose paint remains. These flaws reduce bonding.
How to Repair Wallpaper Bubbles
We address existing air pockets swiftly. We keep substrate integrity in mind, since moisture infiltration or inadequate preparation often weakens the bond.
Simple Fixes
-
Use a pin to release trapped air, if minor bubbles appear.
-
Spread a thin layer of adhesive behind the lifted edge, if the paper detaches.
-
Press firmly with a seam roller, if the bubble remains visible.
-
Wait at least 12 hours for thorough dryness, if a humid environment prompts repeated lifting.
Long-Term Solutions
-
Repair underlying leaks, if moisture infiltration persists.
-
Reinforce the substrate with a primer, if flaking paint or old paste reduces adhesion.
-
Allow the wall to dry completely before installing new paper, if previous damp areas exist.
-
Choose adhesives formulated for vinyl or non-woven papers, if the wallpaper material requires a specialised bond.
House of Londinium recommends using a qualified professional to maintain the elegance of your wallpapers.
How to Prevent Bubbles in Wallpaper
Preventive measures maintain a smooth finish by reducing wallpaper bubbles linked to moisture infiltration, substrate irregularities, and temperature changes. We focus on minimising dampness, reinforcing adhesives, and ensuring stable wall conditions.
-
Confirm wall dryness by waiting at least 24 hours after repairs or patchwork so no hidden moisture remains.
-
Manage interior humidity by aiming for 30–50% in rooms that frequently experience condensation (for instance, bathrooms).
-
Prepare substrates by removing flaking paint or leftover paste to create a stable surface.
-
Choose adhesives (for example, vinyl-specific paste) that match wallpaper composition to reduce separation risks.
-
Inspect problem areas (such as seams or corners) periodically to catch potential air pockets early.
|
Parameter |
Target / Recommendation |
|---|---|
|
Humidity Levels |
30–50% |
|
Drying Time |
~24 hours after wall repairs |
We've found that consistent monitoring and thorough preparation lessen the likelihood of recurring wallpaper bubbles across both humid and dry spaces.